Showing posts with label Sides. Show all posts

Sunday, March 13, 2016

Paleo Flatbread/Naan


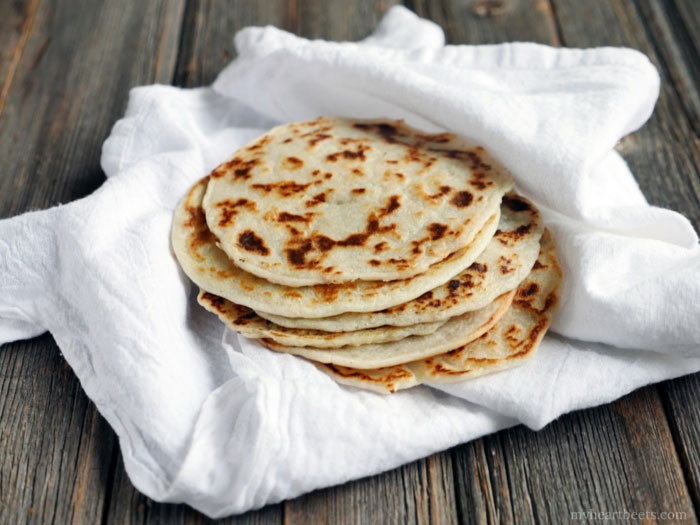
When trying to stay strict Paleo, there are some food items that you really start missing.  But paleo flatbreads have really become my weakness lately, they are SO GOOD!!  I started with this awesome 3-Ingredient Paleo Naan recipe from My Heart Beets (so quick and easy!).  However, I found it to have too much of a sweet coconut flavor and looked to modify it a bit.  This recipe has evolved to yield a wonderful flatbread with a depth of flavor and a great chew.  Depending on the size of each flatbread, this recipe makes 8-12 breads.

Paleo Flatbread/Naan
3-ingredient Paleo Naan by Ashley of MyHeartBeets.com - use this as a flatbread, tortilla, or crepe!!
Photo by MyHeartBeets.com

Ingredients
1/2 cup Arrowroot flour/starch
1/2 cup Tapioca flour/starch
1/2 cup Almond meal/flour
1/4 cup Coconut flour
1 tsp Kosher salt (or to taste)
1/2 cup Full fat coconut milk
1 large egg
3/4 cup water
1 tbsp EVOO
Ghee for cooking (optional)

Directions
Heat a skillet or large frying pan over medium heat until hot.  (If you are using a non-stick pan, no additional fat is needed.  If you are not using a non-stick pan, you may want to add a very small amount of ghee to the pan in between breads.)

Mix all of the dry ingredients together with a whisk in a mixing bowl.

Add all of the wet ingredients to the dry ingredient mix and whisk together until smooth.  Let the mixture sit together and meld for about 15 minutes (this allows the flours to absorb some of the fats in the recipe).

For a 6-8 inch bread, pour about 1/3 cup of the batter into the hot pan and spread to a desired thickness carefully.

Allow the batter to cook until the edges begin to get golden brown and the batter appears dry on the top (about 1 minute).

Using a spatula, carefully flip the flatbread and cook on the other side until brown spots begin to appear on the bottom (about 1 - 2 minutes).

Once done, place the cooked bread in the folds of a flour-sack towel (or similar) until ready to serve.  These can also be keep in a ziplock bag in the refrigerator for about 1 week.

Notes
You can really do anything you want with these; soft taco shells, Indian naan, sandwich wrap, dessert crepe, the possibilities are endless!  I like them so much, I always having at least one plain while I cook them up.  ;-)

Enjoy!!

Thursday, April 3, 2014

Kale Chips

We really detest having to eat kale in my household but we know that we should eat it for our health and so I had to come up with an appealing way to eat this wonderful veggie (sauteing/steaming/roasting it was just not cutting it).  After 2 inedible/failed batches of trying to bake kale chips in our conventional oven last year (following a recipe...I blame the oven), I gave up.  Until...

I noticed that someone had made these with a dehydrator!!!  Bingo!!!  Seriously, give these a try.  It took a while to warm up to their flavor/texture and to get my technique right (about 3 batches), but they are SO worth it and I always feel better after eating them.

Finished kale chips
Kale Chips

Ingredients
1 bunch kale
~1/8 cup olive oil
seasoning (i.e. salt, pepper,onion powder, garlic powder, etc.)

Directions
De-stem the kale leaves and rip into potato chip-sized pieces as you go.  Wash and dry in a salad spinner.

Place the kale in a large mixing bowl, drizzle the oil and mix thoroughly with your hands.  Use enough oil so that the kale leaves are evenly covered with oil, but not dripping.

Add your desired seasoning and continue to mix well, until evenly coated with oil and seasoning.

Arrange in a single layer on your dehydrator trays and dehydrate at about 145°F for 2 - 3 hours, depending on the size and quality of the kale.

Enjoy with wreckless abandon!!
After dehydration
Before dehydration
Notes
When mixing the kale, I use a massaging/kneading motion to really get the oil evenly coated all over the kale leaves (even the curly bits).  It has been my experience that the key to good kale chips is the proper amount and coating of the oil so I cannot stress the importance of this step enough.  Be patient and mix for a long time to ensure evenly coating each leaf.

There are plenty of seasoning suggestions out there on the web.  Parmesan cheese if you're not eating paleo.  Coconut sugar and then painting with chocolate for a sweet treat (sounds like a lot of work to me...).  Cayenne pepper for an added kick...etc.

You can still follow this recipe if you do not have a dehydrator.  Plenty of sources out there suggest doing the same procedure for using a conventional oven.  If you want to try that method:
  • heat your oven to 350°F, 
  • line a baking sheet with parchment paper, 
  • arrange small batches of kale on the lined baking sheet and bake for 10 - 12 minutes, or until the leaf tips just start to turn brown
  • and withhold the seasoning until after the kale has been baked.

To de-stem kale/spinach or any other hardy-stemmed, leafy green:
  1. Grasp the leaf by the stem with your right hand, with the spine of the leaf towards your palm.
  2. With your left hand, gently grab the leaf "flesh" and tear in a downward motion so that you separate the leaf from the stem.

I tried to get some photos of how to do this off the internet, but apparently folks use a knife!!  Forget that!  The fewer dishes I have to wash later the better.  I will have to take some photos of doing this myself and add them later...

This is how I do it:


After giving this recipe a try, Jer (I know, unbelievable!) and I can't get enough of these.  I have been making a batch of them about every other day for the past couple of weeks and I still can't keep up!  Seriously enjoy the boost of energy and general feeling of well-being you get from scarfing large quantities of these awesome snacks!!

Tuesday, January 21, 2014

Sweet Potato Chips

This is another one of my original recipes.  We don't have a deep frier, so this is the stove-top version.  Also, I have not yet found a way to keep these crisp in storage, so you are better off eating them right away (after they cool a little, of course). ;)

Sweet Potato Chips

Ingredients
2 sweet potatoes, cut into thin slices
2 Tbsp plus about 1/3 cup coconut oil
seasoning (i.e. salt, pepper, paprika, garlic powder, etc.)

Directions
Prepare a cookie rack with paper towels to absorb the excess oil.

Heat a heavy-bottomed pan/skillet over medium-high heat.  Add about 1/3 cup coconut oil (or enough to cover the bottom of the pan with about 1/2 inches of oil).

In a bowl combine the sweet potatoes with 2 Tbsp of melted coconut oil and desired seasoning.  Toss the mixture to coat well.

Add the potato mixture to the hot oil in small batches.  Turn every 30 seconds to 1 minute to allow even cooking.  Remove from the pan after a total of about 4 minutes or just before the edges start to brown and place on the paper towels to cool.  Cook the remaining batches.

Eat heartily with a generous helping of Paleo Ketchup!

Notes
If you are not adding any seasoning to your chips, you can skip the entire mixture step including the melted 2 Tbsp of coconut oil.  Just toss those chips directly into the oil!  (carefully, of course).  You can also season these after cooking as desired.  I like mine with a little sprinkling of sea salt.

Also, suggestions, improvements, and variations are ALWAYS welcome!  Feel free to post them in the comments!!


Sweet Potato French Fries

This is actually one of my original recipes.  We don't have a deep frier, so this is the stove-top/oven version.

Sweet Potato French Fries

Ingredients
2 sweet potatoes, cut into shoestrings
2 Tbsp plus about 1/3 cup coconut oil
seasoning (i.e. salt, pepper, paprika, garlic powder, etc.)

Directions
Preheat oven to 375 degrees F and line a heavy baking sheet with parchment paper.

Heat a heavy-bottomed pan/skillet over medium-high heat.  Add about 1/3 cup coconut oil (or enough to cover the bottom of the pan with about 1/2 inches of oil).

In a bowl combine the sweet potatoes with 2 Tbsp of melted coconut oil and desired seasoning.  Toss the mixture to coat well.

Add the potato mixture to the hot oil in small batches.  Turn every 30 seconds to 1 minute to allow even cooking.  Remove from the pan after a total of about 4 minutes or when the edges start to brown and place on the baking sheet.

Keep the baking sheet in the oven while cooking the remaining batches and remove cooked fries after about 10-15 minutes in the oven.  I found this step helps keep the warm and crispy.

Eat heartily with a generous helping of Paleo Ketchup!

Notes
If you are not adding any seasoning to your fries, you can skip the entire mixture step including the melted 2 Tbsp of coconut oil.  Just toss those fries directly into the oil!  (carefully, of course).

Enjoy!

Tuesday, November 13, 2012

Cinnamon Stewed Apples

There is more than one way to stew up some apples.  Here is a simple, basic recipe that I like to start with.  Note that this recipe from Boston Organics originally called for BROWN SUGAR.  I regularly substitute maple syrup for the brown sugar almost 1:1 (sometimes the apples don't need that much sweetening), and I would rather have more spices (hence the larger amounts of cinnamon and nutmeg).

Cinnamon Stewed Apples

Ingredients
6 cups apples (Granny Smith or basic cooking apples), peeled and chopped
1/2 cup maple syrup
1/4 cup apple juice or apple cider
Dash of lemon juice (optional)
1 Tbsp ground cinnamon
1/4 tsp ground nutmeg
1/8 tsp sea salt

Directions
Combine all ingredients in a large, heavy saucepan (I like to use the Dutch oven).  Cover and cook on medium-low heat for 45 minutes or until the apples are tender, stirring occassionally.  Let stand 5 minutes.

Enjoy!!

Tuesday, August 14, 2012

Ratatouille

It has been a long hiatus!!  Sorry about that folks.  The format from now on will be a little different: a very brief recipe will begin my post, with any details at the bottom.  Let me know if you have any comments/suggestions!

Here's our latest "favorite" from the ever awesome folks at Cooks Illustrated.  We deconstructed this and paired it with our Paleo Meatballs to have an excellent meal of meatballs on a bed of roasted veggies, covered in a tomato sauce.  Yum yum!

Ratatouille

Ingredients

2 large eggplants (about 2 to 2 1/2 pounds) cut into 1-inch cubes
2 large zucchini (about 1 1/2 pounds) cut into 1-inch cubes
1/4 cup olive oil
1 large onion, chopped
2 medium garlic cloves, minced
2 medium ripe tomatoes (about 1 pound), peeled and cut into 2-inch cubes
2 tablespoons chopped fresh parsley
2 tablespoons chopped fresh basil
1 tablespoon minced fresh thyme
sea salt and fresh ground pepper to taste


Directions

Prepare the eggplant (see details below).

Adjust two oven racks to upper-middle and lower-middle positions, heat oven to 475 degreees F, and line 2 rimmed baking sheets with aluminum foil.

Toss eggplant, zucchini, and 2 tablespoons of oil together in a large bowl.  Spread mixture evenly in a single layer between the two baking sheets.  Sprinkle with salt and roast, turning the veggies and rotating the sheets every 10 minutes, for 30-40 minutes.

Heat remaining 2 tablespoons of oil in Dutch oven over medium heat.  Add onion, season to taste with salt and pepper, reduce heat to medium-low, and cook until soft and golden brown, about 15 to 20 minutes.  Stir in garlic and cook until fragrant, about 30 seconds.  Stir in tomatoes and cook for about 5 minutes.

In the original recipe, everything is then cooked together, but we kept them separate.  At this point, we added the chopped fresh herbs for about 1 to 2 minutes and then served with the tomato portion ladled over the roasted veggie portion.  Season with salt and pepper or additional fresh herbs to taste.


Notes and Details

To prepare eggplant for cooking, it is important to remove the bitter juices (especially with the larger, globe eggplants).  Believe me, I've tried going without this step and the dish can almost come out inedible, depending on the eggplant.  It's simple, you just have to plan on doing this step ahead of time.  I did this first and then worked on the meatballs while the salt was working its' magic:
------------------------
Place cubed eggplant in a large colander set over a large bowl.  Sprinkle with 2 teaspoons of table salt and toss until the eggplant is evenly covered.  Let the salted eggplant stand in the colander for at least 1 hour and up to 3 hours.  Rinse the eggplant well under running water to remove the salt and remaining bitter juices.  Spread the eggplant evenly in a single layer over a triple thickness of paper towels, cover with another triple thickness of paper towels, and press firmly on the eggplant with the palm of your hands until the eggplant feels dry and compressed.
------------------------
Summer squash can be substituted for one or both of the zucchinis.  I did a 2:1 summer squash to zucchini substitution for this recipe.

If you don't have a Dutch oven, any heavy-bottomed sauce pot will do.  And you can substitute your choice of cooking fat for the oil in this step.

That's it!  Buon appetito!!

Monday, April 2, 2012

Paleo Pad Thai

With a slogan like "Paleo Diet Recipes that don't look or taste like dog food", I was intrigued.  This recipe from Health-Bent is a winner.
Don't forget to read the Notes and Details at the bottom of the page!!

Paleo Pad Thai

Ingredients

1/4 cup fat
2-3 zucchinis
1 onion, finely diced
4 garlic cloves, minced fine
1 Tbs apple cider vinegar
2 Tbs fresh ginger, grated
3 Tbs almond butter
1 Tbs chili garlic sauce
2 Tbs fish sauce
the juice from 1 lime
sea salt and fresh ground pepper to taste
1 Tbs cilantro, whole leaves or coarsly chopped (optional)

Directions

Slice the zucchinis lengthwise with a mandoline (see notes below).

In a saute pan over medium heat, melt the fat of your choice.  Add the onion, garlic, and ginger and saute until they are just starting to get soft (about 2 minutes).  Meanwhile, in a bowl combine the remaining ingredients EXCEPT for the cilantro and whisk together until well mixed.  Add to the sauce mixture to the pan when the onions are just starting to get soft.  Stir to combine.

Add the zucchini to the pan and mix them around so that they are evenly covered with sauce.  Saute until the zucchini is hot and is just starting to soften up; about 10 minutes.

When the zucchini is done, remove the pan from the heat, stir in the cilantro and serve!

Notes and Details

A 1/4 cup of fat does seem like a lot at first; but trust me, it is the proper amount.  I used a mixture of fats to make up 1/4 cup: about 1/3 of that was the rendered pasture-raised local pork fat we get from our friends at Old Havana and I filled the rest of the 1/4 cup with coconut oil.

We don't own a mandoline, but the cheese slicer portion of our multi cheese grater fit the bill beautifully!  Plan C was to try and press hard with a peeler, because I have no confidence in my ability to make thin, uniform zucchini slices with a knife.  I only had 2 zucchinis and so I subbed in a summer squash that didn't change the flavor of the dish at all and just made more of it.  Goody!!  No worries about there being enough sauce either, with the 3 veggies there was plenty of sauce to go around.

If you are doing the Whole30 or Paleo challenge or other jump-starting program, you need to be cautious with the ingredients in your sauces.  Sugar and soy sauce are common ingredients in items such as chili garlic sauce.  Try making your own chili garlic sauce if you are having trouble finding a store-bought one.

My hubby suggests adding some color to this dish with addition veggies such as asparagus or peppers.  Get creative!

The folks at Health-Bent suggest pairing this dish with any kind of grilled or pan seared meat or seafood, and we agree!  Needing to go grocery shopping, we were lacking in the meat department tonight, and so we discovered that this dish tastes excellent even on its own.

Enjoy!!

Saturday, March 31, 2012

A Couple Old Favorites (Part 2): Roasted Veggies

Hi Everyone!

As promised here is another favorite veggie side dish that comes from the genius of my hubby's mother, Toni.  We have been enjoying this dish for a couple years before starting the switch to Paleo, and it is a great one for flexibility and minimal prep: Roasted Vegetables

In an effort to streamline my blog posts/recipes, I am rearranging the text to put the notes and additional details AFTER the main recipe.  Please read all the way through if you have questions/concerns.  Or just comment/contact me!
------------------------------------------------------------------------------------------------
Roasted Veggies

Ingredients

olive oil
balsamic vinegar
garlic (5+ cloves crushed and finely chopped)
sea salt and fresh ground pepper to taste
1 tsp sugar*
1 tsp lemon zest
1 bell pepper, cut into slices
1/2 eggplant, cut into about 1/2 inch half-moon slices
1/2 onion, cut into about 6 wedges and the layers separated
fresh herbs (basil, rosemary, thyme)

Directions

In a container/zip lock bag combine all the ingredients--EXCEPT for the herbs--and marinate for at least 30 minutes.  At the end you may want to sprinkle some fresh herbs before serving.

Line a baking sheet with aluminum foil and arrange the marinated veggies in a single layer on the foil.  Place in an oven heated to 400 degrees F on the middle rack and roast for 30 to 40 minutes, flipping the veggies about halfway through.

When all the veggies look cooked and have a nice crispiness forming (about 40 minutes), remove the pan from the oven and sprinkle on some fresh chopped herbs.

------------------------------------------------------------------------------------------------

Notes and Details

You will notice that one of the ingredients (sugar*) is not Paleo.  Because I am still doing my 30 day bit, I simply omit this ingredient and the result is still delicious.  However, substituting a "Paleo Sugar" such as maple syrup or raw honey could work great here.

There is nothing more frustrating than a recipe that doesn't give the amounts!  Sorry about that, but this one you will have to trust your gut on and find your own happy amount of olive oil and balsamic vinegar, especially if you are switching up the types and amounts of veggies that you are roasting.  For the veggies listed in this recipe, about 1/2 cup olive oil and 3 Tbs balsamic is good.  You are aiming for about a 3:1 olive oil to balsamic ratio.  You can use more or less garlic, depending on your taste, as well.  The eggplant will absorb a lot of the oil and flavor, which makes them so darn good by the end. :D

Once you have prepped all your ingredients and combined the marinade in your container/zip lock, go ahead and add the veggies to the marinade and coat well.  We like using a zip lock because you can really mush the marinade around the veggies and get them thoroughly coated, but my inner environmental Nazi gets a little peeved sometimes by the use of plastic.  Toss the marinating veggies anywhere you please (the fridge, the counter, etc.) to sit and soak in the juices.  You want them to marinate for a minimum of 30 minutes; of course, longer is better and I like to aim for an hour.

When you are ready to bake your veggies, heat your oven to 375 or 400 degrees F, depending on the temperament of your oven, with the rack in the middle position.  Cover a baking pan (rimmed cookie sheet, or other heat-conductive pan with shallow side-walls) with aluminum foil.  You can skip the aluminum foil, but the juices do tend to burn onto the pan pretty harshly with this recipe.  Arrange the marinated veggies on the aluminum foil in such a way that they cover the pan in a single layer.  If you have more veggies then what will fit in the pan you can do this recipe in batches or save the marinated veggies to bake the next day.

If you are adding some faster-cooking veggies to this recipe (such as asparagus), place them on the pan with the other veggies when you are flipping them or when you have about 15 minutes of baking time left.  Squash such as zucchini and summer squash can also be used with this recipe and can be incorporated from the very beginning.


Et voila!!  Irresistible veggies!!!  They are even better the next day as leftovers!

------------------------------------------------------------------------------------------------
What do you want next?  Another dinner, maybe some snacks?  I know that my avocado deviled eggs are in high demand...how about that one?

Happy Living!!

Thursday, March 29, 2012

A Couple of Old Favorites (Part 1): Sauteed Mushrooms

Ciao a Tutti!!

My super awesome hubby (cape and all) made dinner tonight so I get to catch up on a little back-log of recipes I need to post.  So here are a couple of my 'pre-paleo' favorite sides: Sauteed Mushrooms and Roasted Vegetables.

Sauteed Mushrooms

These sauteed mushrooms are an adaptation from the recipe "Champignons Sautes au Beurre" by the brilliant Ms. Julia Child published in her cookbook "Mastering the Art of French Cooking."  As an aside, this cookbook is a veritable treasure-trove of amazing recipes; highly recommended for so many reasons!

I promise you, this recipe is so good you will want to eat the mushrooms on their own and/or will find yourself wanting to add them to all kinds of other dishes.  Ms. Child adds the following advice: "Successfully sauteed mushrooms are lightly browned and exude none of their juice while they are being cooked; to acheive this the mushrooms must be dry, the butter [fat and oil] very hot, and the mushrooms must not be crowded in the pan."  My permutation:

Ingredients:

1 Tbs of pasture-raised pork fat
3-4 Tbs of olive oil
1 lb fresh mushrooms (white, button, baby bella, whatever your heart desires) washed and left whole if small or sliced or quartered if large
Optional: 1 to 2 Tbs minced shallots or green onions
sea salt and fresh pepper to taste

Heat a heavy-bottomed pan or skillet over high heat with the fat and oil until it has come to temperature (about 1 - 2 minutes).  Add the mushrooms and toss and shake the pan for 4 - 5 minutes until the mushrooms are all well coated and they start to absorb the fat.  In 2 to 3 minutes the fat will appear on their surface and the mushrooms will begin to brown.  As soon as they have browned lightly, remove from heat.  If you want to add shallots/green onions, toss them in with the mushrooms when you have about 2 minutes left and saute with the mushrooms over moderate heat.

Enjoy!!!

Next post: A DEE-LICIOUS roasting of some wonderful veggies as prepared by my incredible mother-in-law (and nutrition guru of 25+ years), Toni.  Seriously, I don't know how this woman does it.  And her food is amazing!

Happy Living!!